Taking hoof photos - a guide to taking good hoof photos for a laminitis/trim evaluation
Firstly, there's taking photos in ideal conditions, and then there's taking photos of the feet of horses with laminitis! The rule book goes out of the window and you may have to be inventive and versatile when taking hoof photos of a horse in pain due to laminitis. However, the sooner you can get decent photos, the sooner necessary action may be identified, so don't just decide to wait until your horse is more comfortable, as chances are it's the changes in the feet that need to be rectified that are causing the pain (same goes for having x-rays taken - always have x-rays taken as soon as a horse shows signs of laminitis).
The most useful views for a laminitis/trim evaluation are lateral (from the side) and solar (looking at the sole). If a horse has active laminitis, he may not be able to pick up a foot for a solar view - in this case, the solar view can probably follow when the horse is more comfortable, or try taking the solar view when the horse is lying down.
Camera - a digital auto-focus camera is ideal. Experiment with settings to find the clearest, sharpest photos. Auto, portrait or macro (flower symbol) settings are best.
Surface - ideally, stand the horse on a clean, flat and firm surface, like concrete, or firm rubber mats. Grass and bedding may obscure important details and/or cause blurring. Feet may sink into a soft surface (e.g. sand, soft rubber mats), again obscuring important details. However, if a horse has laminitis, it should generally not be moved and possibly not take even one step on hard ground - see if you can move the bedding away from the horse's foot enough to take photos. Remove any clutter, and try to have, or make, a solid background that will give a good contrast to the foot.
Light - natural, even light is best. Try to avoid taking photos into direct sunlight (e.g. the barn or stable doorway). Try to avoid shadows falling across the foot (that includes your shadow). Ensure there is enough light to see features of the foot clearly - use a flash if necessary, experiment with both flash and no flash.
Clean the feet - the feet must be spotlessly clean. Pick them out well, brush them with a stiff brush, and if necessary wash and dry them (sometimes leaving the feet wet can highlight particular features, e.g. divergent hoof rings, so experiment). Ideally, clean the feet away from where you will photograph the feet to avoid getting water and dirt in your photography area. With a horse in pain from laminitis, you may not be able to clean the soles well if the horse isn't comfortable to hold his feet up for long. Try cleaning the feet out when he is lying down.
Prepare the feet/legs - trim all hair away from the hairline, so that the exact join of skin to hoof is clearly visible. For horses with feathers, use bandages, boots or Tubigrip to hold the hair up off the hoof, ensuring the hairline is clear. Marking features that aren't obvious in 2D, like the back of the heels, e.g. with a marker pen, can be very helpful, or take photos straight after a trim. Also mark any features that you are concerned about, e.g. ridges in the sole, so that we are clear what you are referring to. Take photos before marking the foot, then with the marks in place.
Make sure you can identify the feet when looking at the photos later. Some people label each foot with a pen, e.g. LF, LH, or take the photos with the foot on or next to paper/markers labelled LF, LH etc. We take a half body photo first (for our use only) that clearly identifies the leg/foot about to be photographed. Try to always take photos in the same order. Some people like to take lateral photos first - LF, LH, RH, RF, then sole photos. Others like to do all the LF photos - lateral, toe, medial, heel, sole, oblique sole, sole down the heel, then move onto the next foot. Label the photo files clearly as soon as you can, with the foot, view, trim status (if relevant), date and horse, e.g. 20180627 LF lat AT Dolly 1 (that tells us the photo is the first lateral view of the left fore for Dolly, taken 27 June 2018 after being trimmed (trim status is only usually necessary if before and after trims are being compared, or trims in relation to x-rays). If you are sending photos to The Laminitis Site, please use this labeling system if you can:
1. date (4 digit year, 2 digit month, 2 digit day)
2. foot (LF, LH, RH, RF)
3. view (lat, toe, med, heel, sole, sole oblq, sole heel)
4. before or after trim if relevant (BT = before trim, AT = after trim)
5. horse name
6. number of photo if more than 1 photo of the same view (1, 2, 3 etc) (NB ideally we want one good view. Sending several poor photos of the same view does not equate to one good view!).
to give e.g. 20180627 LF lat AT Dolly 1
Apart from oblique (angled) views, "perpendicular", "square on" and "parallel" are key when taking hoof photos. Have the camera level with the subject, not angled up or down (this means on the ground when taking lateral, toe, heel and medial photos). Just a few degrees off "square" can affect the angles and may make accurate interpretation of problems or mark ups impossible. Aim to have the subject in the centre of the photo and almost filling the view finder, but make sure there is some space around it. Edit photos on your computer before sending if necessary - we shouldn't have to do that for you.
Always check photos carefully before sending them - the better quality the photos, the better the evaluation is likely to be. If you can't identify all the features of the foot on the photo, when you can look at the real foot, you can be pretty sure we won't be able to either. Don't waste our time or yours - only send clear photos of clean feet showing the view asked for, that represent the actual feet as closely as possible.
1. Lateral (and medial) view
The lateral view is the side-on view of the outside of the foot and should be as close to a 2D view as possible - that is, it should show from the centre of the toe to the back of the nearest heel bulb.
Ideally the horse should be standing square and weight bearing equally on all 4 feet, with vertical cannon bone (however, that's often not going to be possible with a laminitic horse).
The camera must be on the ground at the same level as the foot for this view.
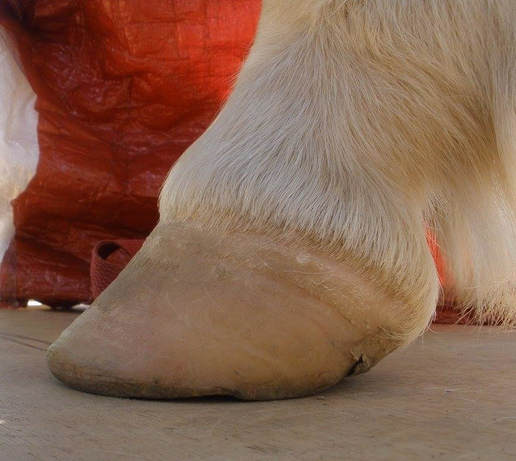
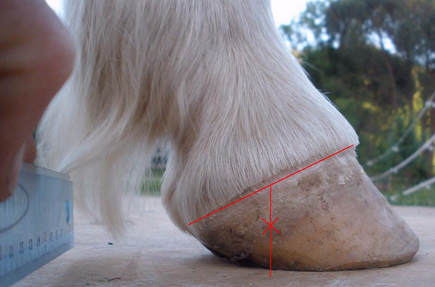
The camera must be perpendicular (at 90 degrees to) the foot, and should be focused around the middle of a vertical line dropped down from the centre of the hairline - as indicated by the red cross in the photo below right. Most of the lateral photos we are sent have the focus too far forwards and cannot be used.
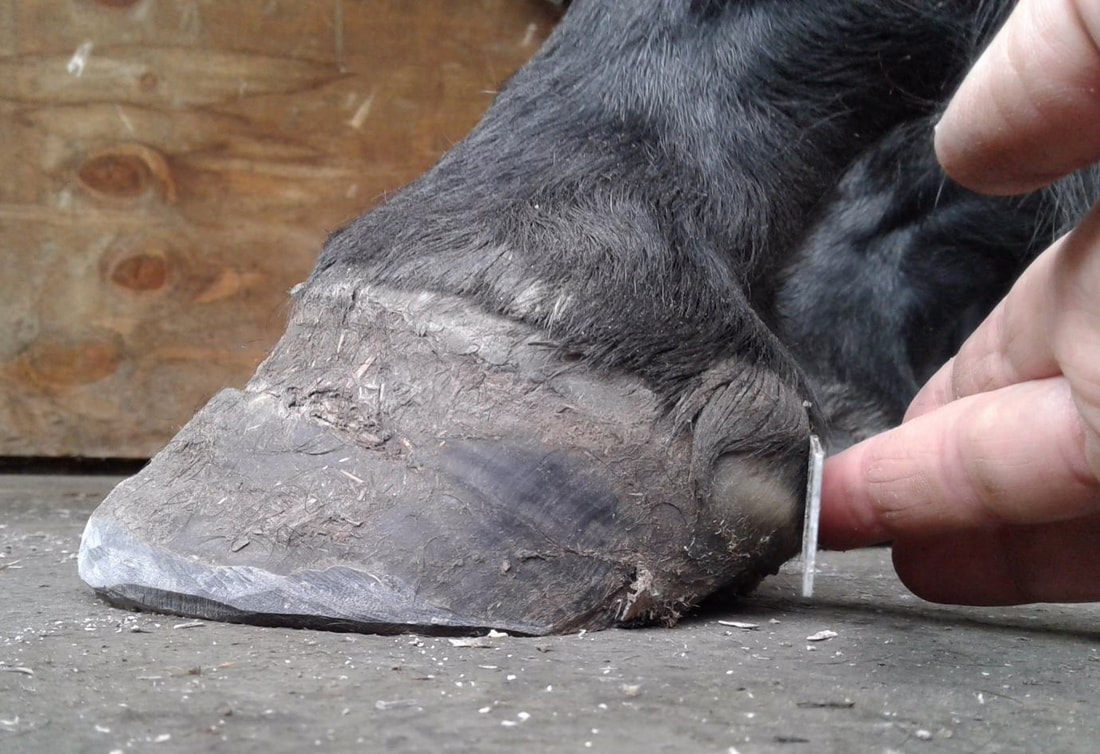
Holding a straight object like a ruler against both heel bulbs and placing the camera parallel to the ruler can help ensure a perpendicular view.
A solid background that's a different colour to the hoof will help make the features of the hoof clear - in the above photo a shopping bag makes an excellent contrasting background to a light coloured hoof.
The lateral photo should include the pastern, so that the hoof pastern angle can be assessed and compared to the line of the toe.
The hair must be trimmed back (or held up and away) from the hairline for the hairline angle (and therefore P3 rotation) to be assessed, and for the position of the true frog apex to be estimated - this is particularly important at the toe and heel.
The medial view is the side-on view of the inside of the foot - this should be taken in the same way as the lateral view, but from the other side of the horse, and with the opposite foot lifted up or placed in front of or behind the foot being photographed so as not to obscure that foot.
2. Solar view
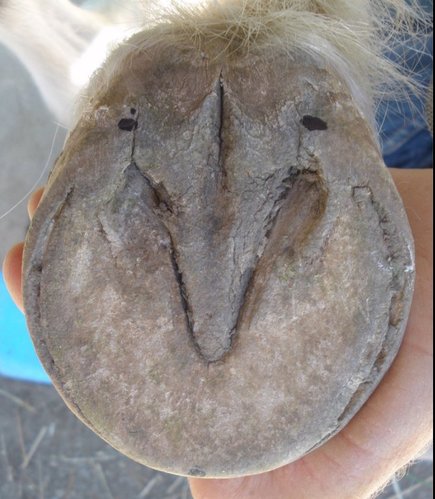
The solar view should show from the toe/breakover at the toe to the back of the frog and heels clearly.
The camera should be parallel to the sole, to reduce distortion.
Marking features that aren't obvious on a photo, e.g. the exact point of breakover at the toe, the back of the heels, with pen is very helpful (black lines in photo (above left)).
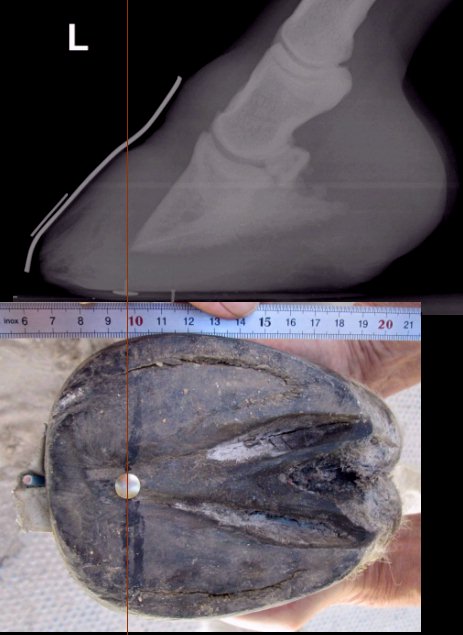
Holding a scale (e.g. a ruler or tape measure) against the foot can help check for distortion (photo above right).
Note how taking a clear photo of the sole with x-ray markers in place allows the photo and x-ray to be approximately lined up, helping to guide the trim - image above right. In this photo/x-ray combination the frog marker is too far forwards and not at the true frog apex - the frog has grown forwards. We know this because the true frog apex is always behind the tip of P3, and usually approximately where marked by a line dropped down from the hairline at the toe, when the palmar angle is around 5 degrees.
