Herbie
Click on the photos to see them full screen.
NB P3 = pedal bone.
NB P3 = pedal bone.
Left Fore
June 2013
|
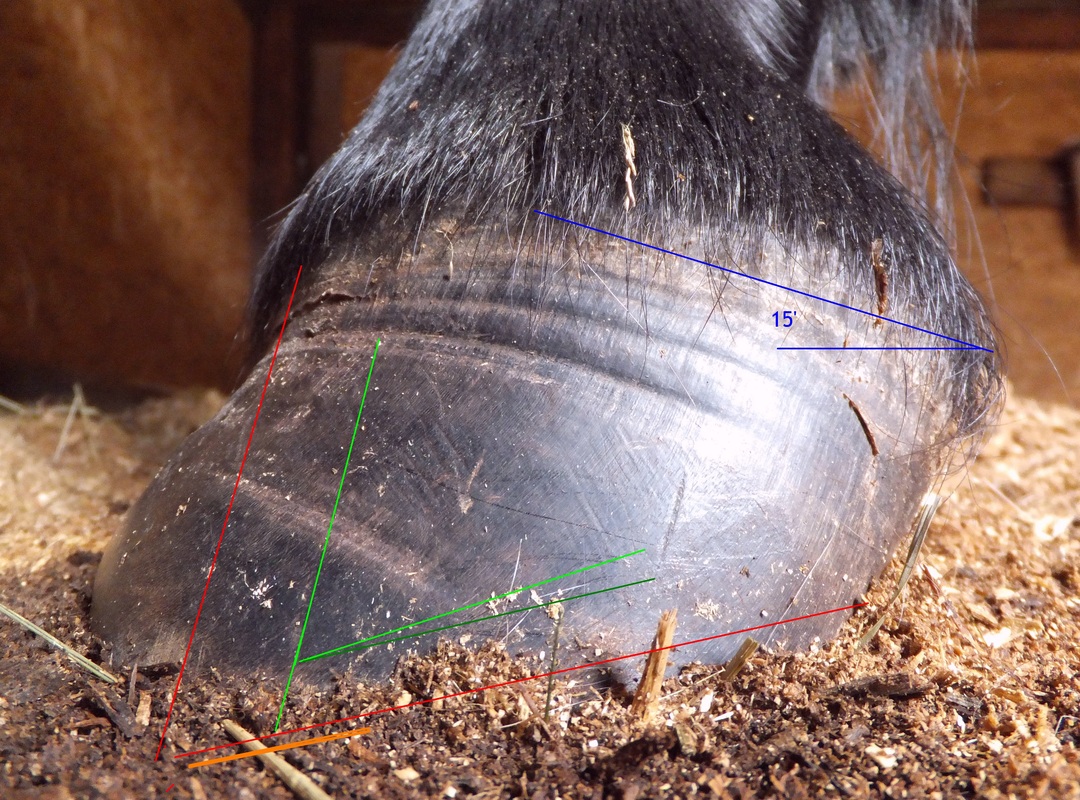
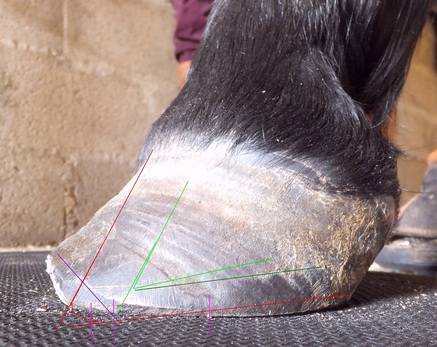
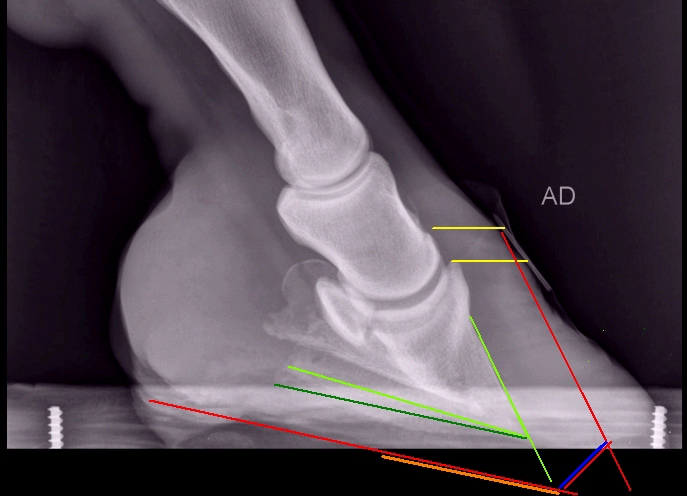
<- Red line at toe - toe shows considerable flaring and change of angle. New growth below coronet can be projected down to indicate where toe should be. Blue line - hairline is too "flat", making an angle of 15 degrees (or less) with the ground, suggesting that the heels are too high and there is palmar rotation. Red line at sole - heel needs to be trimmed approx. to this line, but preserving and encouraging sole depth in front of the pedal bone (orange line). Pastern and toe are not parallel. Note the hoof rings that widen at the heel - a classic sign of chronic laminitis. <- How the hoof will (eventually) look when trimmed/bevelled to the red lines.
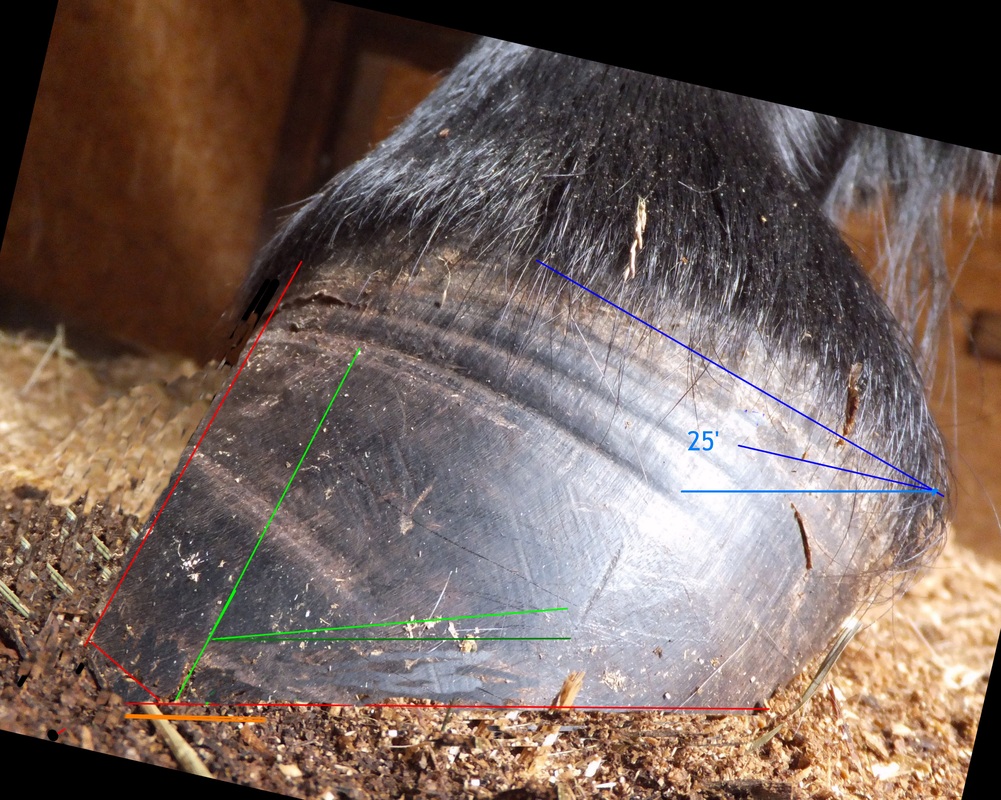
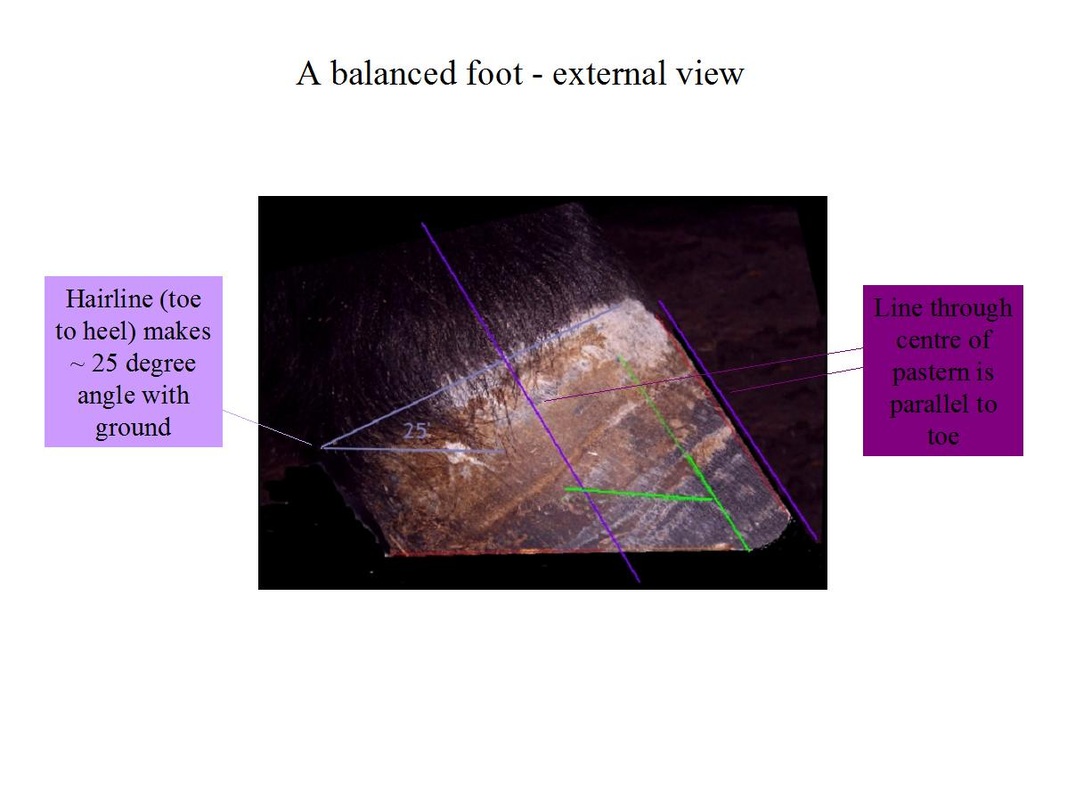
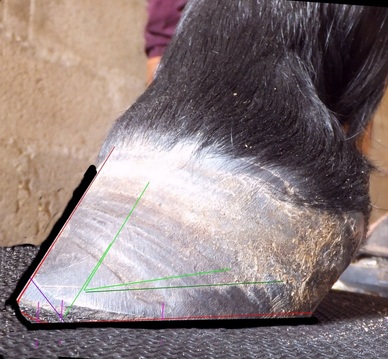
Red - toe is now parallel to the pastern and dorsal aspect of the pedal bone (green) and in line with the correct new growth directly under the coronet. This is achieved by applying a bevel at the correct breakover (at or just in front of the green line projected down the dorsal surface of the pedal bone) and waiting 6 - 9 months for a healthy well connected wall to grow down from the coronet - this retains support and protection from the wall. Blue - the hairline now makes an angle of approx. 25 degrees with the ground. NB as the walls and heels are correctly trimmed, the hairline should lose the bulge and become straighter (or this may be camera angle distortion). Orange - the sole in front of the pedal bone has not been touched, and must be protected to encourage new growth as there was very little between the tip of the pedal bone and the ground. Red - the heel is lowered to reduce the palmar angle to around 5 degrees, restoring the pedal bone to its correct alignment and significantly reducing the pressure under the tip of the pedal bone (which is likely to have been contributing to the lack of sole depth). The heel can be corrected immediately (although ideally in a long-term chronic case the heel should be taken down gradually over a few days), the breakover can be bevelled immediately, but the toe will take around 9 months to grow correctly down from the coronet. |
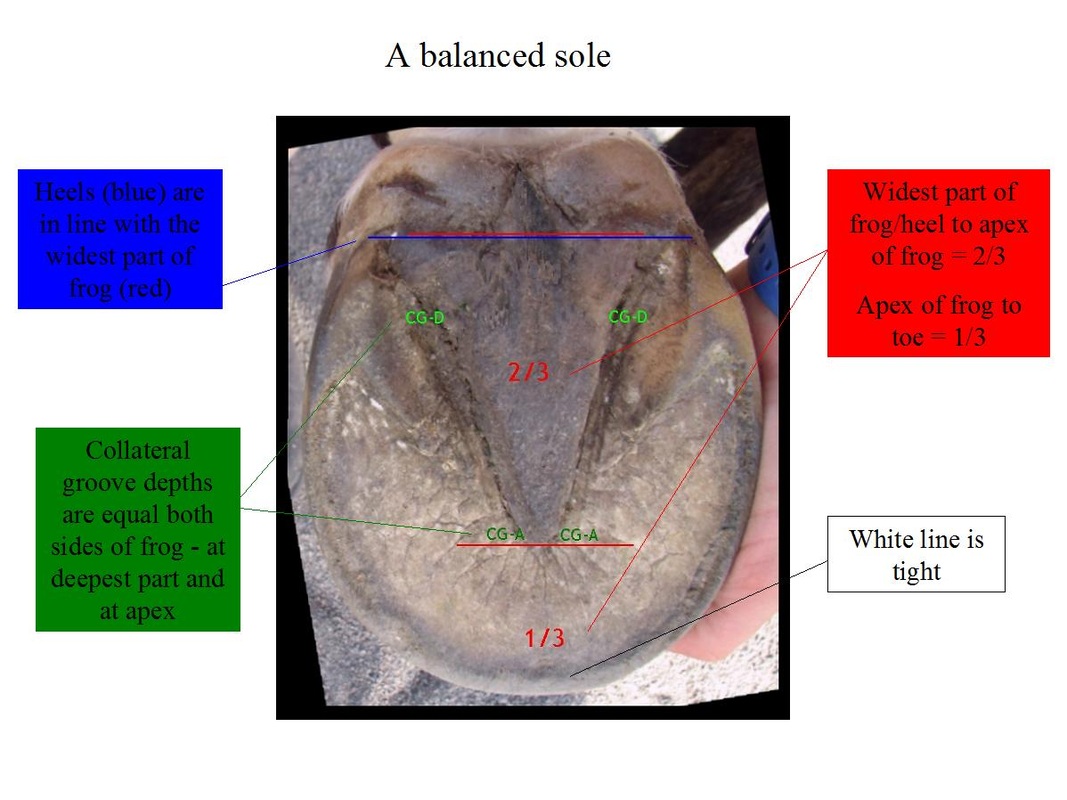
Above - although not a perfect foot, note how 2/3 of the length of the foot is behind the apex of the frog, and 1/3 in front, and the white line is hardly noticeable (it could still be tighter on this foot).
|
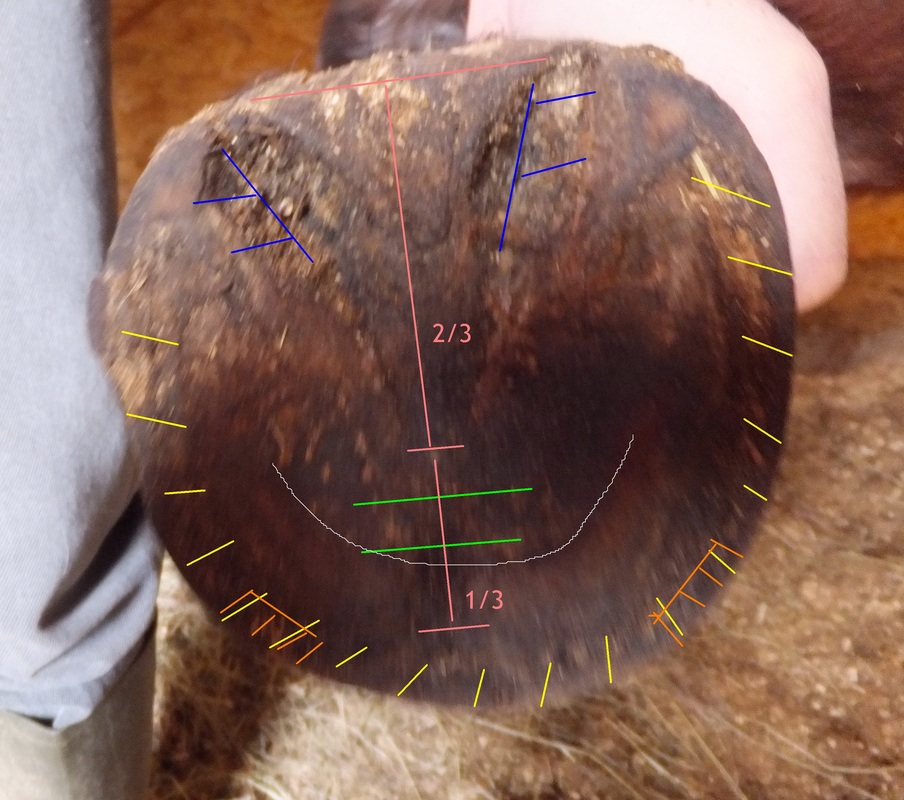
Not the best photo, but from the sole view (and from seeing the foot) we can see:
Blue - the heels are too high - the collateral groove depth at the deepest part was almost 3 cm, at the apex it was close to 0. Measuring the collateral groove depths at the deepest part and the apex, and measuring the distance between these two points enabled us to calculate that the palmar angle was likely to be around 18 degrees - which x-rays confirmed. The heels and frog should be equally weight bearing. If the horse stands on a flat hard surface, it should be impossible to insert a credit card underneath the frog - because the frog is fully weight bearing. To determine the correct heel height: 1. Take x-rays 2. Measure the collateral groove depth - see below. 3. Find the live sole by digging gently in the seat of corn with a hoof pick - the corner where the wall bends back to form the bar. Live sole is hard and waxy - like parmesan cheese. Dead sole is chalky and will flake off usually easily - although it can become compressed and hard and be mistaken for live sole when the heels have been too high, and in dry conditions. All the time the heel is too high, there is rotation of P3, and the tip of P3 will be causing excess pressure on the sole, causing pain and potentially damaging cells in the bone and the sole. Pink - the toe is too long. A balanced foot will have approx. 2/3 of its length behind the apex of the frog and 1/3 in front. White - a clear outline of the pedal bone can be seen on this foot. That along with no collateral groove depth at the apex of the frog and no concavity indicate that there is very little sole protecting the pedal bone. The area of sole marked with green lines must be protected at all times by keeping the horse on deep soft conforming bedding and/or by using boots with thick pads, possibly with a hole or hollow directly under the tip of P3 to relieve pressure. Yellow - the white line is stretched around the whole foot. The wall is not fully connected to the pedal bone and therefore the outer wall should be bevelled to reduce separating forces on the wall. Note that what looks like sole has filled the area between the pedal bone and what appears to be the white line at the toe - this is the laminar wedge. The white line cannot be used as a guide for trimming the toe in cases like this. Orange - to protect the sole directly under the tip of P3, if possible some wall height should be retained at 10 and 2 o'clock (if the toe is 12 o'clock). |
Bone loss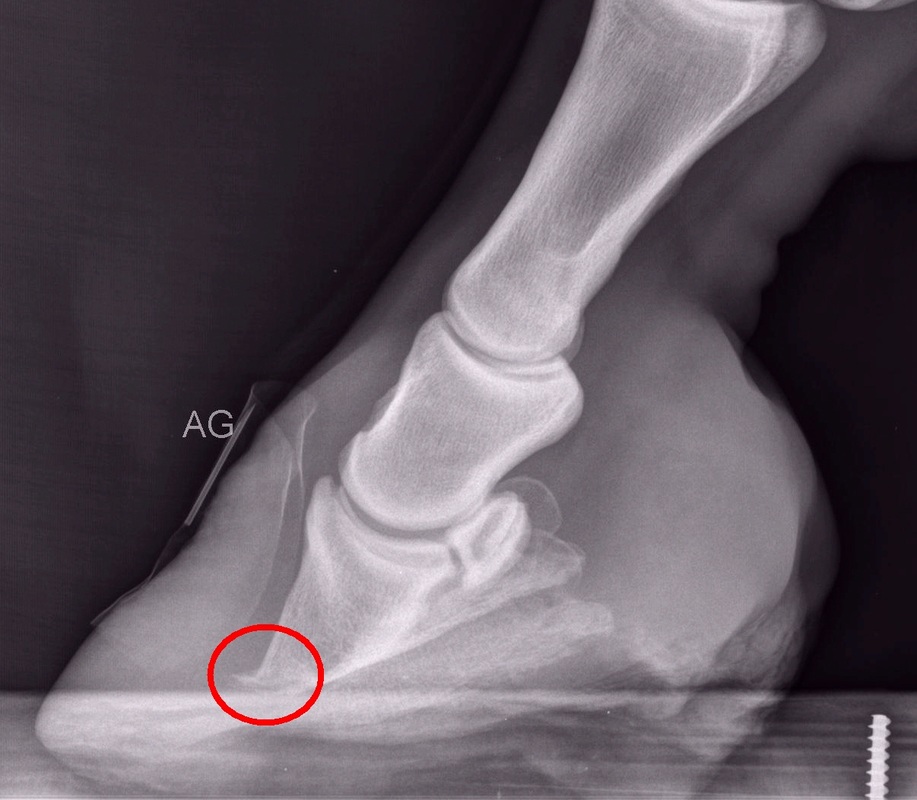
The left fore shows some bone loss and a "ski tip" at the tip of the pedal bone, presumably caused by long term uncorrected rotation and inadequate sole protection.
|
Angles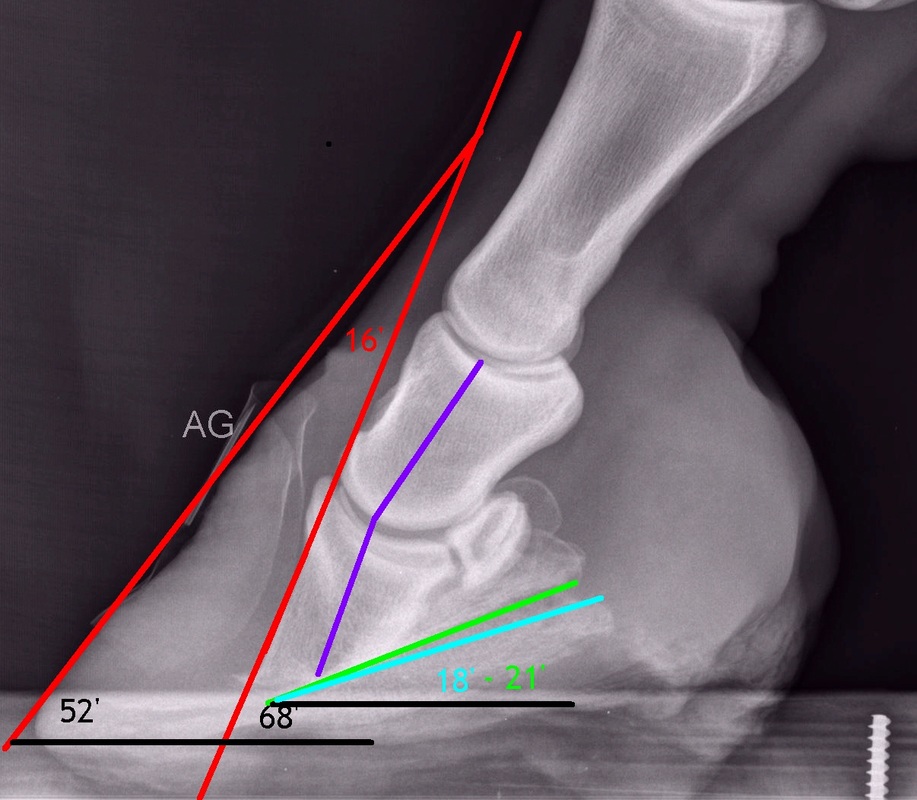
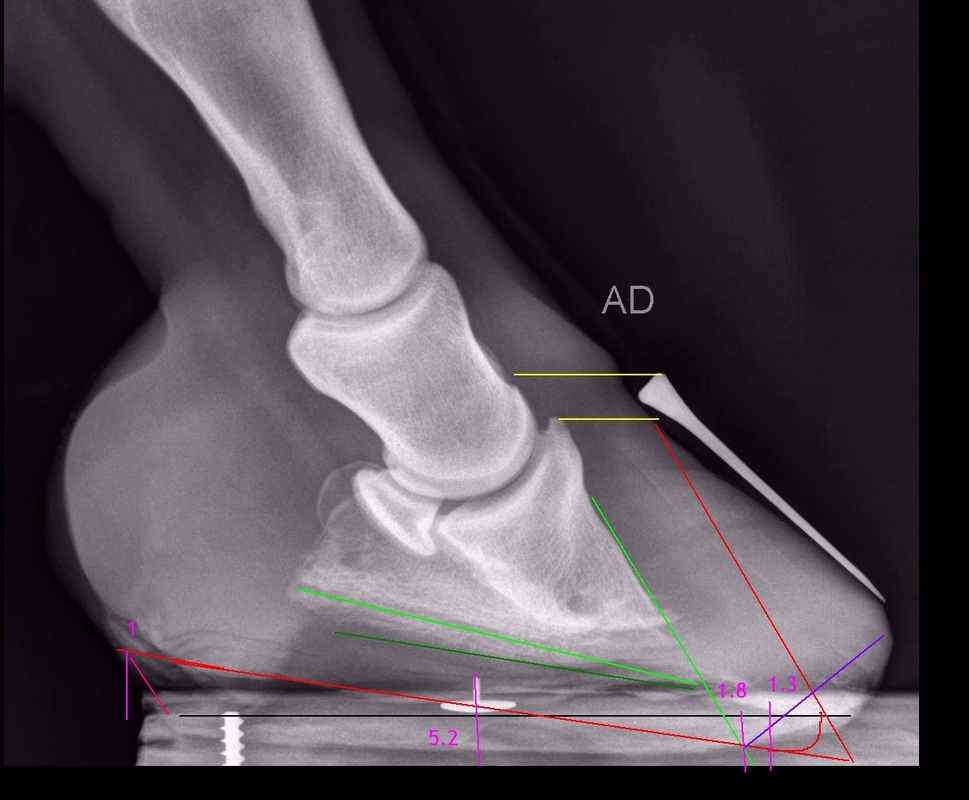
Red - the dorsal angle (which is fairly irrelevant in our opinion - this shows how far the toe/wall has stretched away from the pedal bone - correct breakover has to be restored in line with the pedal bone regardless of what this angle is) is around 16 degrees (68 - 52), although difficult to measure as the wall at the toe is far from straight or even.
Green/turquoise - as the x-ray beam was not perpendicular to the foot (the horse was on sawdust rather than a hard flat surface, therefore the x-ray machine was held) it is difficult to accurately assess the palmar angle, but it is likely to be around 18 degrees. A "healthy" palmar angle is often considered to be between 3 and 5 degrees, therefore the heels need to be lowered to reduce this angle. Purple - there should be a straight line through the bones below the fetlock - the bend in the purple line indicates that there is bony as well as capsular rotation - this is to be expected with a palmar angle > 10 degrees, and will correct when the heel is lowered. However, gradual lowering of the heel would be advised, and perhaps massaging of the digital flexor muscle. |
Right: How the hoof will (eventually) look when trimmed/bevelled to the red lines. The palmar angle has been restored to around 5 degrees, returning the pedal bone to its correct alignment and reducing the pressure under the tip of the pedal bone. Breakover is (just in front of or) at the point where a line run down the dorsal aspect of the pedal bone meets the ground - the toe is bevelled to this point to retain the integrity of the hoof wall and to encourage correct new growth. Sole depth has been preserved and encouraged beneath the tip of the pedal bone - the collateral groove measurement at the apex of the frog should be a minimum of 1 cm - the rasp should never go within 1.5 cm of the bottom of the collateral grooves. To lower the heel but retain sole depth beneath the tip of P3 may mean that part of the rasp is floating in the air*, and that the bottom of the foot may not be perfectly flat for a while - the horse should be kept on thick soft bedding and/or in boots with thick pads, so can easily deal with this - it is important to visualise the foot the horse needs, rather than the foot the horse currently has, when trimming - i.e. some areas need to be allowed to grow. * See this excellent video by Linda Cowles for a demonstration of how to "float" the rasp (from around minute 3.28). |
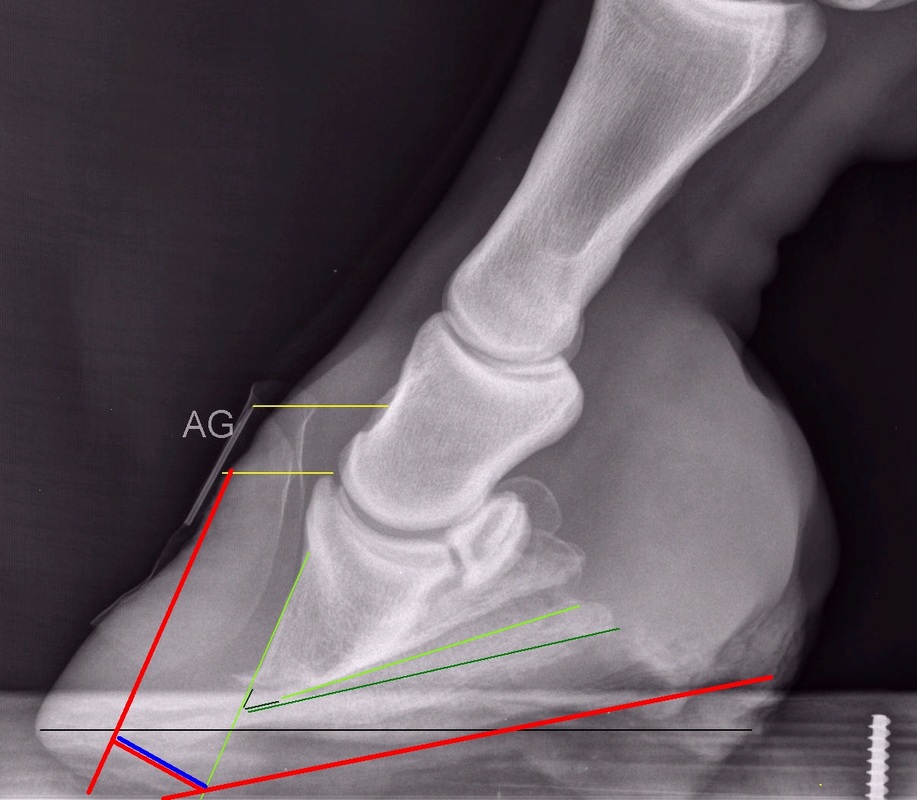
Left:
Light green line indicates the pedal bone, with line projected along the dorsal surface to the ground to indicate breakover. Dark green line is drawn at 5 degrees from the solar surface of the pedal bone as a guide for the heel trim line. The green triangle indicates the tip of the pedal bone that has been lost. Red line indicates hoof that needs to be trimmed/grown - the heel can be trimmed to this line to restore the palmar angle to around 3-5 degrees. The toe is bevelled to the blue line (or just in front of this) to correct the breakover - once the breakover is correct, new growth from the coronet will follow the red line at the toe. Yellow lines indicate distal descent (sinking) - this can correct if the trim is kept perfect, the diet is correct and the horse suffers no further laminitis. The horse doesn't actually have this much sole depth under the tip of the pedal bone at the moment (black line is estimated ground line) - the sole depth will need to be preserved and encouraged. 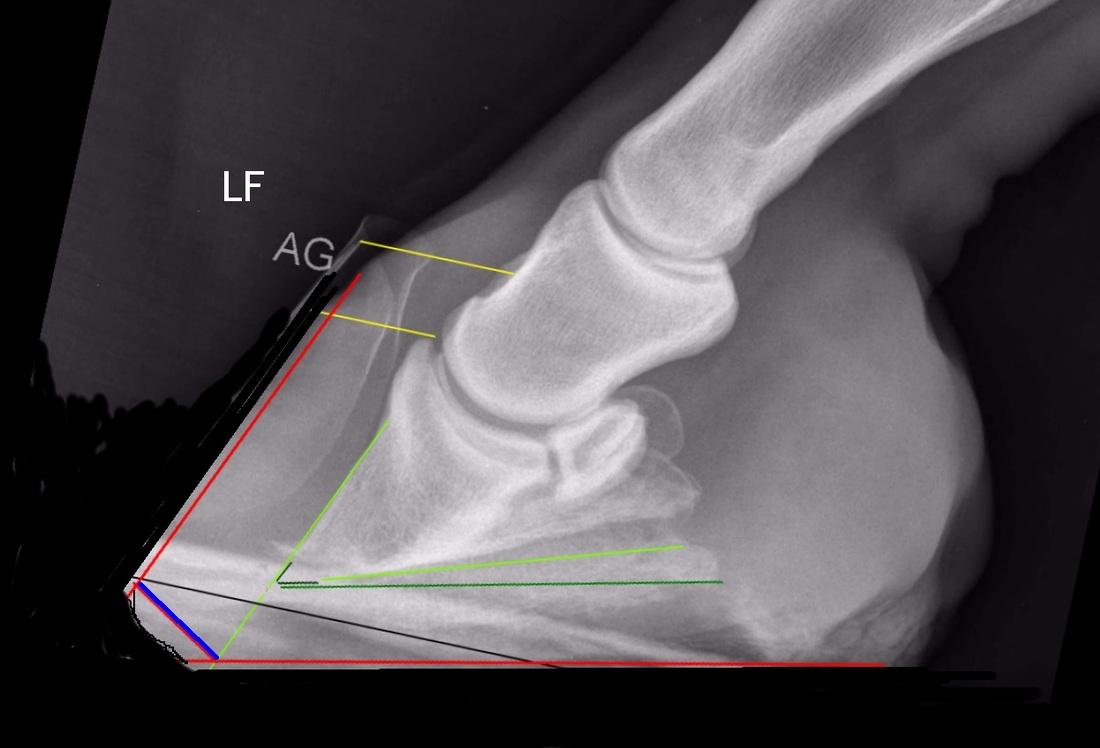
|
October 2013
|
|
|
Right Fore

|
The right fore is very similar to the left, and once again the clues indicating rotation can be read in the external hoof:
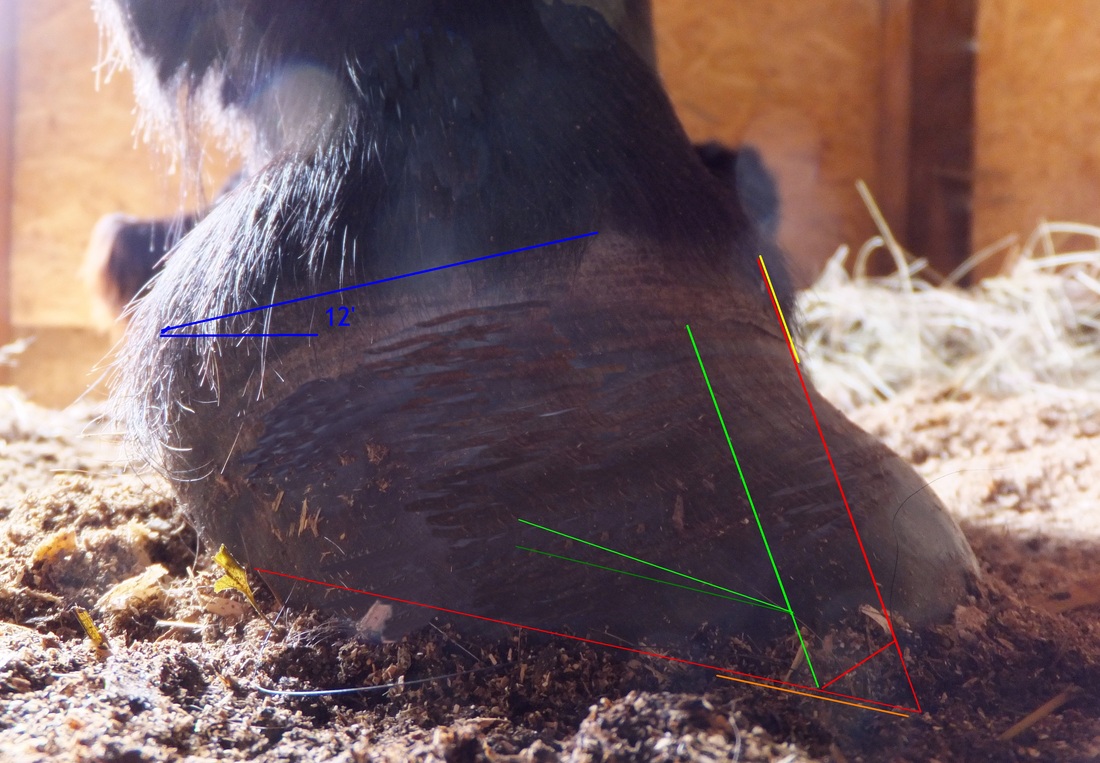
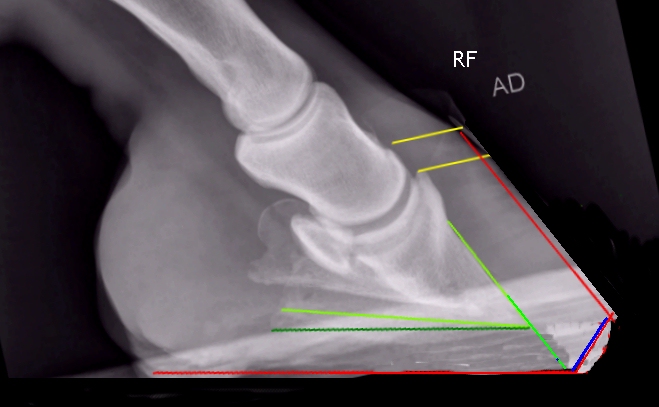
The yellow line indicates the healthy new growth directly beneath the coronet - the toe should always follow this line down to the ground (red toe line). The hairline (blue) angle is far too shallow (around 12 degrees when it should be around 25 degrees) indicating that the heel is too high. The dorsal aspect of the pedal bone (green) will be parallel to the "true" toe (i.e. the yellow line). The lack of collateral groove depth (almost 0 cm) at the apex of the frog suggests distal descent of the pedal bone, and tells us that the sole in front of the frog must be protected and encouraged to thicken (orange line). The significant depth (approx. 3 cm) at the deepest part of the collateral groove indicates high heels and suggests a significant palmar angle, again calculated to be around 19 degrees. How the foot will look when correctly trimmed: The toe (red) follows the healthy new growth directly beneath the coronet (yellow). Breakover is in line with (or just in front of) a line drawn down the dorsal aspect of the pedal bone (green). The heel has been lowered to give a palmar angle of around 3-5 degrees. Lowering the heel has restored the hairline angle to around 25 degrees (blue/turquoise). The sole beneath the tip of the pedal bone will need to develop, the collateral groove depth at the apex of the frog should be at least 1 cm - until then the horse should be kept on conforming bedding and/or in boots with thick pads. |
|
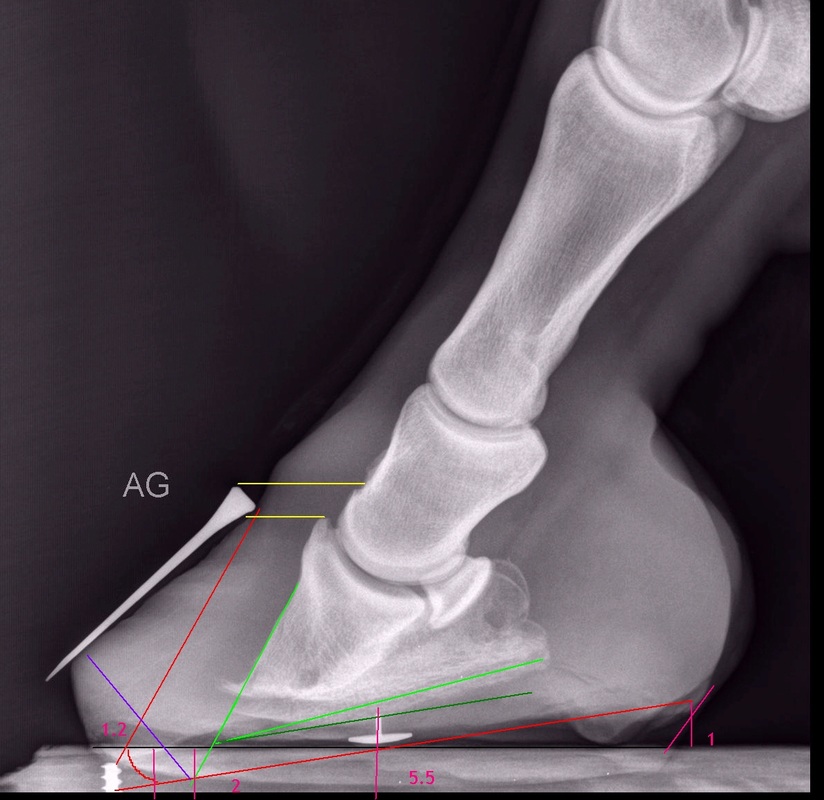
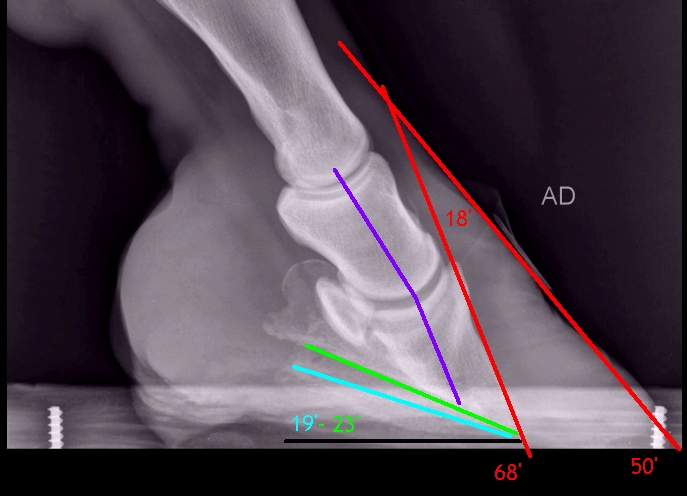
The dorsal angle is around 18 degrees (red). It should be 0 (i.e. the hoof wall at the toe should be parallel to the dorsal aspect of the pedal bone). The palmar angle, again difficult to calculate accurately because the x-ray machine was not perpendicular to the foot, is around 19 degrees (green/turquoise). It should be 3-5 degrees. The purple line indicates bony (phalangeal) rotation. There is also capsular rotation. The tip of the pedal bone is hard to see clearly but there doesn't appear to be any obvious bone loss or ski-tip. The hairline marker is above the top of the extensor process of the pedal bone, indicating that there is distal descent (sinking) (marked in yellow below). Note the wide gap between the short pastern bone (P2) and the pedal bone (P3), this also suggests distal descent. |
|
|
Green - marks pedal bone and line projected down the dorsal aspect of the pedal bone to the ground to indicate breakover.
Dark green - indicates a 5 degree palmar angle, the heel trim will follow this line. Blue/red - bevel needed at the toe to establish correct breakover, this will allow the new hoof to grow correctly down from the coronet following the red toe line. By applying a bevel but not dressing the hoof wall above the bottom third, hoof strength and protection is maintained. The heel can be trimmed to the red sole line to achieve a 3-5 degree palmar angle. This should be done quickly but as this is long-term rotation, a small trim every couple of days would be best to prevent damage to the soft tissues, and the heel should never be lowered by more than 1 cm in any trim. Orange - the sole beneath the tip of the pedal bone is currently very thin - this area must be protected and encouraged to develop. Yellow - the extensor process of the pedal bone is below the coronet, indicating distal descent of the pedal bone. How the hoof will eventually look when trimmed/bevelled to the red lines. |
October 2013
|
Further information:
See Sorrel's case study - particularly the progressive sole photos - to see how easily this trim can be achieved.
More information on The Laminitis Site's Feet page
www.ecirhorse.org Realigning Trim
Pete Ramey - Understanding the horse's sole
Trimming a toe rocker - www.all-natural-horse-care.com
A mild approach to trimming the walls - leaving the walls a rasp's width above the sole:
www.healthyhoof.com
A more aggressive approach to trimming the walls - the "white line strategy" trim for stretched white line/flared walls:
www.barefoothorse.com
Another nice trim:
www.ironfreehoof.com
Recognising healthy feet is very important - laminitis doesn't change anything, you always aim to get a laminitic foot back to being a healthy foot as soon as possible. Some great examples on Linda Cowles' website:
www.healthyhoof.com
|
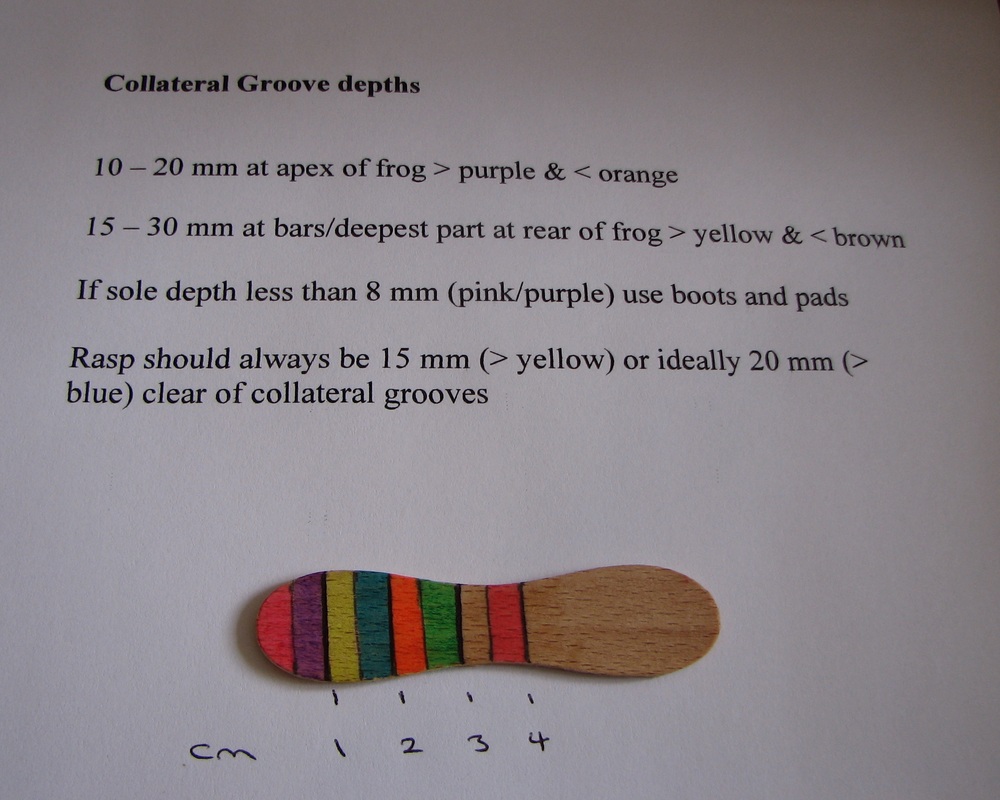
Collateral Groove Measurement
Learning to measure the collateral groove depth is very important - see the Precision Hoof Pick website for an explanation of how to do this with photos. You need something hard, flat and even, like a rasp or metal ruler, to lay across the top of the hoof, and a measuring stick/hoofpick to measure the depth. You can make a collateral groove depth measuring stick very easily with a lolly stick, some coloured pens and a ruler -> Measure the CGs at the deepest part, which is normally towards the back of the foot, in line with the bars, and at the apex/tip of the frog. Measure both sides of the frog - this tells you whether the foot is balanced from side to side. The CG depth is measured from the bottom of the collateral groove to the junction of the sole with the wall. So if you have wall height above the sole, you will need to take this wall height off the measured depth, to calculate the true depth. Pete Ramey suggests that collateral groove depth should normally be: 10 - 20 mm at the apex of the frog 15 - 30 mm at the deepest part towards the rear of the frog. If you have less than 8 - 10 mm CG depth, always use boots with thick pads or keep the horse on deep soft conforming bedding to protect the sole until the sole has thickened. When trimming, always keep the rasp 15 mm above the bottom of the collateral grooves - this may mean floating the rasp in the air. 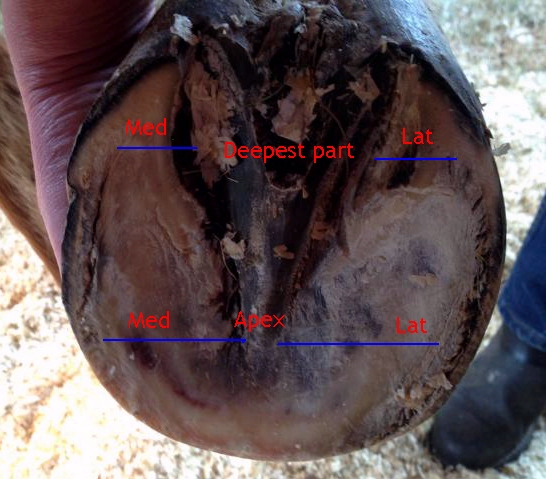
|
From Pete Ramey - Understanding the horse's sole:
"Since the sole is the first line of defense between the horse and the ground, its proper management is crucial to soundness. Luckily we have a very reliable guide. The seams between the sole and frog; the collateral grooves, are the most reliable and important guide we have for determining the needs of the foot. A full understanding of their significance and the information they offer will give you “x-ray vision” when you look at every hoof." 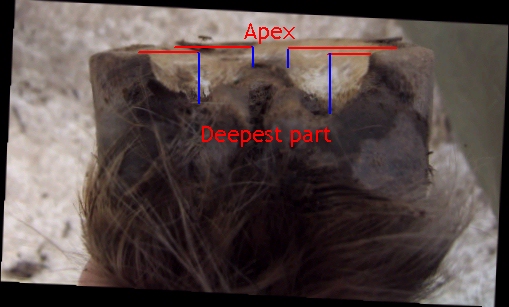
|
Disclaimer:
Always seek expert advice from a professional trained in hoofcare.
It is very difficult to get an idea of a foot from a photo, especially sole concavity and heel height.
These comments are simply impressions based on similar case studies.
Comments are designed to get owner and/or farrier/trimmer/vet to look at/consider certain aspects/measurements, rather than to be a trimming guide.
Obviously the rules of trimming such as never touching live sole/dermal tissue always take precedence over any suggestions made.